Handwritten Digit Recognition
Handwritten digit recognition is used to recognize digits which are written by hand using artificial neural networks.
Introduction
In this blog our goal is to build and train a neural network, which recognizes handwritten digits with good accuracy. It will be able to recognize the digits from 0 to 9.
Import libraries
For this we will need the following imports:
import cv2
import numpy as np
import tensorflow as tf
import matplotlib.pyplot as plt
Tensorflow is the main library here. We will use it to load data sets, build neural networks, train them etc. The other three libraries are not necessary for the functionality of the neural network. We are only using them in order to load our own images of digits at the end.
Numpy will be used for reformatting our own images and Matplotlib will be used for their visualization.
CV2 is the OpenCV library and it will allow us to load our images into the script. You will need to install this module separately:
LOADING AND PREPARING DATA
Before we start building and using our neural network, we need to first get some training data and prepare it.
For this we are going to use the MNIST dataset which contains 60,000 training examples and 10,000 testing examples of handwritten digits that are already classified correctly. These images have a resolution of 28x28 pixels. We will use the keras module, in order to load the dataset.
mnist = tf.keras.datasets.mnist

(X_train,y_train),(X_test,y_Test)= mnist.load_data()
In order to get the dataset, we access the mnist object from the keras.datasets . Then we call the load_data function. This function automatically splits the data appropriately and returns a tuple with the training data and a tuple with the testing data. In order to make the whole data easier to process, we are going to normalize it. This means that we scale down all the values so that they end up between 0 and 1.
X_train = tf.keras.utils.normalize(X_train, axis=1)
X_test  = tf.keras.utils.normalize(X_test,axis=1)
For this we use the normalize function of keras.utils . We have now structured and normalized our data so that we can start building our neural network.
BUILDING THE NEURAL NETWORK
Lets think about what kind of structure would make sense for our task. Since we are dealing with images, it would be reasonable to build a convolutional neural network.
model = tf.keras.models.Sequential()We use the models module from keras to create a new neural network. The Sequential constructor does this for us. Now we have a model, which doesn’t have any layers in it. Those have to be added manually.
model.add(tf.keras.layers.Flatten(input_shape = (28,28)))We start out by adding a so-called Flatten layer as our first layer. In order to add a layer to our model, we use the add function. Then we can choose the kind of layer that we want from the layers module. As you can see, we specified an input shape of 28x28 which represents the resolution of the images. What a flattened layer basically does is it flattens the input and makes it one dimensional. So instead of a 28x28 grid, we end up with 784 neurons lined up. Our goal is now to get to the right result based on these pixels.
model.add(tf.keras.layers.Dense(units = 128, activation = tf.nn.relu))
model.add(tf.keras.layers.Dense(units = 128, activation = tf.nn.relu))
In the next step we now add two Dense layers. These are our hidden layers and increase the complexity of our model. Both layers have 128 neurons each. The activation function is the ReLU function. Dense layers connect every neuron of this layer with all the neurons of the next and previous layer. It is basically just a default layer.
model.add(tf.keras.layers.Dense( units = 10 , activation =tf.nn.softmax))Last but not least we add an output layer. This one is also a dense layer but it only has ten neurons and a different activation function. The values of the ten neurons indicate how much our model believes that the respective number is the right classification. The first neuron is for the zero, the second for the one and so on.
The activation function that we use here is the softmax function. This function scales the output values so that they all add up to one. Thus it transforms the absolute values into relative values.
Every neuron then indicates how likely it is that this respective number is the result. We are dealing with percentages.
model = tf.keras.models.Sequential()
model.add(tf.keras.layers.Flatten( input_shape =( 28 , 28 )))
model.add(tf.keras.layers.Dense( units = 128 , activation =tf.nn.relu))
model.add(tf.keras.layers.Dense( units = 128 , activation =tf.nn.relu))
model.add(tf.keras.layers.Dense( units = 10 , activation =tf.nn.softmax))
In a nutshell, we have a flattened input layer with 784 neurons for the input pixels, followed by two hidden layers and one output layer with the probabilities for each digit.
COMPILING THE MODEL
Before we start training and testing our model, we need to compile it first. This optimizes it and we can also choose a loss function.
model.compile( optimizer = 'adam' , loss = 'sparse_categorical_crossentropy' , metrics =[ 'accuracy' ])TRAINING AND TESTING
Now we get to the essential part of the whole project – the training and testing. For this, we just have to use the fit function of our model.
model.fit(X_train, y_train, epochs = 3 )Here we pass our x- and y-values as the training data. Then we also define the number of epochs that we want to go through. This number defines how many times our model is going to see the same data over and over again.
loss, accuracy = model.evaluate(X_test, y_test)
print (loss)
print (accuracy)
After that we use the evaluate method and pass our testing data, to determine the accuracy and the loss. Most of the time we get an accuracy of around 95% (try it yourself). This is pretty good if you take into account that mere guessing would give us a 10% chance of being right. Our model performs quite well.
model.save( 'digits.model' )Instead of training the model over and over again every single time we run the script, we can save it and load it later on. We do this by using the save method and specifying a name.
model = tf.keras.models.load_model( 'digits.model' )If we now want to load the model, we can just use the load_model function of keras.models and refer to the same name.
CLASSIFYING YOUR OWN DIGITS
Now that we know that our model works and performs quite well, let us try to predict our own handwritten digits. For this you can either use a program like Paint, and set the resolution to 28x28 pixels, or you can actually use a scanner, scan a real digit and scale the picture down to that format.
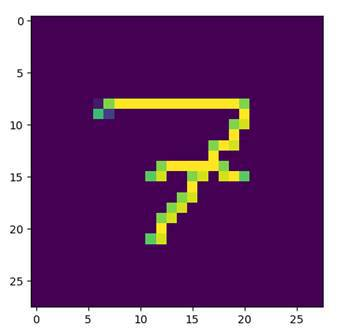
img = cv2.imread( 'digit.png' )[:,:, 0 ]
img = np.invert(np.array([img]))
In order to load our image into the script, we use the imread function of OpenCV. We specify the file name and use the index slicing at the end in order to choose just one dimension, in order to fit the format. Also we need to invert the image and convert it into a NumPy array. This is necessary because otherwise it will see the image as white on black rather than black on white. That would confuse our model.
prediction = model.predict(img)
print ( 'Prediction: {}' .format(np.argmax(prediction)))
plt.imshow(img[ 0 ])
plt.show()
Now we use the predict method to make a prediction for our image. This prediction consists of the ten activations from the output neurons. Since we need to generate a result out of that, we are going to use the argmax function. This function returns the index of the highest value. In this case this is equivalent to the digit with the highest probability or activation. We can then visualize that image with the imshow method of Matplotlib and print the prediction.
Prediction: 7
Conclusion
Handwritten Digit Recognition using python is the program to interpret the manually written digits from various sources like messages, bank cheques, papers, pictures, in various situations. There are many challenges such as the distortion of handwritten characters, as many different types people may use different style of handwriting, direction etc. If we want to improve the accuracy of the program then we need use techniques such as adding more layers to the network with same hyperparameters and make the network more deeper.