Python - Networking
Introduction to Python Networking

NETWORK PROGRAMMING
Now we get into one of the most interesting intermediate topics – network programming . It is about communicating with other applications and devices via some network. That can be the internet or just the local area network.
SOCKETS
WHAT ARE SOCKETS?
Whenever we talk about networking in programming, we also have to talk about sockets . They are the endpoints of the communication channels or basically, the endpoints that talk to each other. The communication may happen in the same process or even across different continents over the internet. What’s important is that in Python we have different access levels for the network services. At the lower layers, we can access the simple sockets that allow us to use the connection-oriented and connectionless protocols like TCP or UDP, whereas other Python modules like FTP or HTTP are working on a higher layer – the application layer .
CREATING SOCKETS
In order to work with sockets in Python, we need to import the module socket .
import socketNow, before we start defining and initializing our socket, we need to know a couple of things in advance: · Are we using an internet socket or a UNIX socket? · Which protocol are we going to use? · Which IP-address are we using? · Which port number are we using?
The first question can be answered quite simply. Since we want to communicate over a network instead of the operating system, we will stick with the internet socket .
The next question is a bit trickier. We choose between the protocols TCP ( Transmission Control Protocol) and UDP ( User Datagram Protocol). TCP is connection-oriented and more trustworthy than UDP. The chances of losing data are minimal in comparison to UDP. On the other hand, UDP is much faster than TCP. So the choice depends on the task we want to fulfil. For our examples, we will stick with TCP since we don’t care too much about speed for now.
The IP-address should be the address of the host our application will run on. For now, we will use 127.0.0.1 which is the localhost address. This applies to every machine. But notice that this only works when you are running your scripts locally.
For our port we can basically choose any number we want. But be careful with low numbers, since all numbers up to 1024 are standardized and all numbers from 1024 to 49151 are reserved . If you choose one of these numbers, you might have some conflicts with other applications or your operating system.
import socket
s = socket.socket(socket.AF_INET,socket.SOCK_STREAM)
Here we created our first socket, by initializing an instance of the class socket . Notice that we passed two parameters here. The first one AF_INET states that we want an internet socket rather than a UNIX socket . The second one SOCK_STREAM is for the protocol that we choose. In this case it stands for TCP . If we wanted UDP , we would have to choose SOCK_DGRAM.
A server opens up a session with every client that connects to it. This way, servers are able to serve multiple clients at once and individually.
SERVER SOCKET METHODS
There are three methods of the socket class that are of high importance for the servers. So we have a socket that uses the IP protocol (internet) and the TCP protocol. Now, before we get into the actual setup of the socket, we need to talk a little bit about clients and servers.
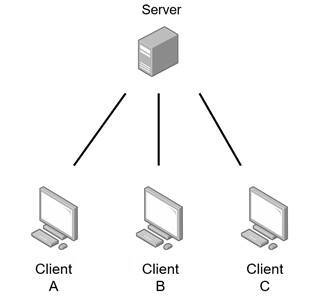
CLIENT-SERVER ARCHITECTURE
In a nutshell, the server is basically the one who provides information and serves data, whereas the clients are the ones who request and receive the data from the server.A server opens up a session with every client that connects to it. This way, servers are able to serve multiple clients at once and individually.
SERVER SOCKET METHODS
| SERVER SOCKET METHODS | |
|---|---|
| METHOD | DESCRIPTION |
| bind() | Binds the address that consists of hostname and port to the socket |
| listen() | Waits for a message or a signal |
| accept() | Accepts the connection with a client |
CLIENT SOCKET METHODS
For the client, there is only one specific and very important method, namely connect . With this method the client attempts to connect to a server which then has to accept this with the respective method. There are three methods of the socket class that are of high importance for the servers.
OTHER SOCKET METHODS
| OTHER SOCKET METHODS | |
|---|---|
| METHOD | DESCRIPTION |
| recv() | Receives a TCP message |
| send() | Sends a TCP message |
| recvfrom() | Receives a UDP message |
| sendto() | Sends a UDP message |
| close() | Closes a socket |
| gethostname() | Returns hostname of a socket |
CREATING A SERVER
Now that we understand the client-server architecture, we are going to implement our server. We decided that we want to use TCP and an internet socket. For the address we will use the localhost address 127.0.0.1 and as a port, we will choose 9999 .
s = socket.socket(socket.AF_INET,
socket.SOCK_STREAM)
s.bind(( '127.0.0.1' , 9999 ))
s.listen()
print ( 'Listening...' )
Here we initialize our socket. We then use the method bind , in order to assign the IP-address and the port we chose. Notice that we are passing a tuple as a parameter here. Last but not least, we put our socket to listening mode by using the method listen .After that, we just have to create a loop that accepts the client requests that will eventually come in.server.py
import socket
s = socket.socket(socket.AF_INET,
socket.SOCK_STREAM)
s.bind(( '127.0.0.1' , 9999 ))
s.listen()
print ( 'Listening...' )
while True :
client, address = s.accept()
print ( 'Connected to {}' .format(address))
message = 'Hello Client!'
client.send(message.encode( 'ascii' ))
client.close()
The method accept waits for a connection attempt to come and accepts it. It then returns a client for responses and the address of the client that is connected. We can then use this client object in order to send the message. But it’s important that we encode the message first, because otherwise we can’t send it properly. At the end, we close the client because we don’t need it anymore. Also, there are some other socket methods that are quite important in general.
CREATING A CLIENT
Now our server is done and we just need some clients that connect to it. Our clients shall request a resource from the server. In this case, this is the message “Hello Client!” . For our client we also need a socket but this time it will not use the function bind but the function connect . So let’s start writing our code into a new file.
import socket
s = socket.socket(socket.AF_INET,
socket.SOCK_STREAM)
s.connect(( '127.0.0.1' , 9999 ))
We just create an ordinary internet socket that uses TCP and then connect it to the localhost IP-address at the port 9999. To now get the message from the server and decode it, we will use the recv function. client.py
import socket
s = socket.socket(socket.AF_INET,socket.SOCK_STREAM)
s.connect(( '127.0.0.1' , 9999 ))
message = s.recv( 1024 )
s.close()
print (message.decode( 'ascii' ))
After we connect to the server, we try to receive up to 1024 bytes from it. We then save the message into our variable and then we decode and print it.
CONNECTING SERVER AND CLIENT
Now in order to connect these two entities, we first need to run our server. If there is no server listening on the respective port, our client can’t connect to anything. So we run our server.py script and start listening. After that, we can run our client.py script many times and they will all connect to the server. The results will look like this:
Server Listening… Connected to (‘127.0.0.1’, 4935) Connected to (‘127.0.0.1’, 4942) Connected to (‘127.0.0.1’, 4943) Connected to (‘127.0.0.1’, 4944) Connected to (‘127.0.0.1’, 4945)
Client Hello Client! One thing you might optimize on that script if you want is the exception handling. If there is no server listening and our client tries to connect, we get a ConnectionRefusedError and our script crashes. Now you can fix this with the knowledge from the first book.
PORT SCANNER
Now we have learned a lot about multithreading, locking, queues and sockets. With all that knowledge, we can create a highly efficient and well working port scanner . What a port scanner basically does is: It tries to connect to certain ports at a host or a whole network, in order to find loopholes for future attacks. Open ports mean a security breach. And with our skills, we can already code our own penetration testing tool.
import socket
target = '10.0.0.5'
def portscan(port):
  try :
    s = socket.socket(socket.AF_INET, socket.SOCK_STREAM)
    conn = s.connect((target, port))
    return True
  except :
    return False

for x in range ( 1 , 501 ):
if (portscan(x)):
  print ( 'Port {} is open!' .format(x))
else :
  print ( 'Port {} is closed!' .format(x))
So this scanner is quite simple. We define a target address. In this case, this is 10.0.0.5 . Our function portscan simply tries to connect to a certain port at that host. If it succeeds, the function returns True . If we get an error or an exception, it returns False . This is as simple as a port scan can get. We then use a for loop to scan the first 500 ports and we always print if the port is open or closed.
Just choose a target address and run this script. You will see that it works. Port 21 is closed! Port 22 is open! Port 23 is closed! Port 24 is closed! Port 25 is open!
But you will also notice that it is extremely slow. That’s because we serially scan one port after the other. And I think we have already learned how to handle that.
THREADED PORT SCANNER
In order to speed up the scanning process, we are going to use multithreading . And to make sure that every port gets scanned and also that no port is scanned twice, we will use queues.
import socket
from queue import Queue
import threading
target = '10.0.0.5'
q = Queue()
for x in range ( 1 , 501 ):
  q.put(x)
def portscan(port):
  try :
    s = socket.socket(socket.AF_INET,socket.SOCK_STREAM)
    conn = s.connect((target, port))
    return True
  except :
    return False

def worker():
  while True :
    port = q.get()
    if portscan(port):
      print ( 'Port {} is open!'.format(port))
So we start by creating a queue and filling it up with all numbers from 1 to 500. We then have two functions. The portscan function does the scanning itself and the worker function gets all the ports from the queue in order to pass them to the portscan function and prints the result. In order to not get confused with the output, we only print when a port is open because we don’t care when a port is closed.
Now we just have to decide how many threads we want to start and then we can go for it.
for x in range ( 30 ):
t = threading.Thread( target =worker)
t.start()
In this example, we start 30 threads at the same time. If you run this, you will see that it increases the scanning speed a lot. Within a few seconds, all the 500 ports are scanned. So if you want, you can increase the number to 5000.
The results for my virtual server are the following: Port 25 is open! Port 22 is open! Port 80 is open! Port 110 is open! Port 119 is open! Port 143 is open! Port 443 is open! Port 465 is open!
As you can see, there are a lot of vulnerabilities here. You now just have to google which ports are interesting and depending on your side you may either prepare for an attack or fix the security breaches. For example port 22 is SSH and quite dangerous.